
 PKR
PKR 
Installing an SSL certificate on your website is crucial for securing user data, improving SEO rankings, and ensuring trust with your visitors. If you’re using HosterSale’s cPanel hosting, you’re in luck—cPanel offers easy ways to install SSL using AutoSSL and Let’s Encrypt SSL. This step-by-step guide will show you how to install SSL on cPanel, ensuring your site is HTTPS-secured and compliant with modern web standards.
Why Installing SSL on Your Website is Essential
Securing your website with SSL certificates provides numerous benefits, including:
- Data Protection: SSL encrypts data transferred between your site and visitors, keeping sensitive information like passwords and credit card details safe.
- SEO Boost: Google prioritizes secure websites in search results, meaning HTTPS can improve your site’s visibility.
- Increased Trust: Visitors are more likely to trust and engage with a website that displays the secure HTTPS padlock.
- Browser Warnings: Avoid browser warnings like “Not Secure” which can deter users from visiting your site.
Now, let’s dive into the methods for installing SSL in cPanel.
Step 1: How to Install SSL in cPanel Using AutoSSL
AutoSSL is the default SSL solution in cPanel, providing an automated process for installing and renewing SSL certificates using Let’s Encrypt. AutoSSL is available by default with most modern cPanel hosting providers.
Step-by-Step Guide:
1. Login to Your cPanel Account
- Access your cPanel by visiting
https://yourdomain.com/cpaneland entering your credentials (username and password).
2. Navigate to SSL/TLS Status
- Once inside cPanel, locate the SSL/TLS Status option, usually found under the “Security” section. Use the search bar if needed.

3. Select Domains for SSL
- In the SSL/TLS Status interface, you’ll see all the domains and subdomains under your account.
- Select the checkboxes for the domains and subdomains that you want to secure with SSL.
4. Run AutoSSL
- Click the “Run AutoSSL” button to initiate the process. AutoSSL will now issue and install Let’s Encrypt SSL certificates for the selected domains.
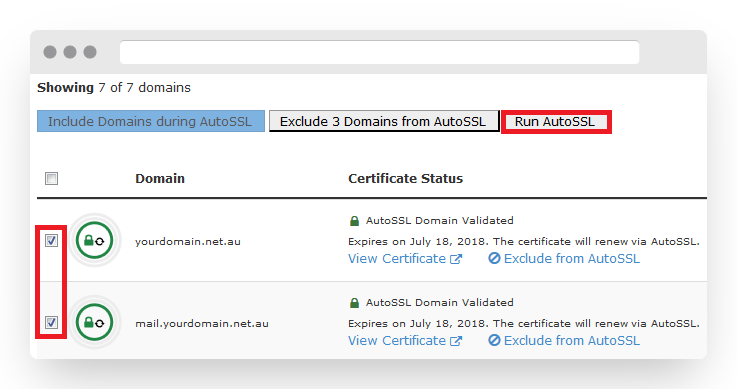
5. Verify Installation
- Once the process is complete, visit your website to ensure SSL is active. Check for the padlock icon and “https://” in the address bar.
Key Benefits of AutoSSL:
- Fully Automated: Automatically installs and renews SSL certificates for all your domains.
- Wildcard SSL Support: Covers both your root domain and any associated subdomains.
- Minimal Effort: No manual installation required, making it the easiest option for SSL.
Step 2: How to Install SSL in cPanel Using Let’s Encrypt SSL Interface
In addition to AutoSSL, the Let’s Encrypt SSL plugin allows users to manually manage SSL certificates. This is a great option if you prefer more control or want to issue certificates for specific domains.
Step-by-Step Guide:
1. Login to cPanel
- As before, login to your cPanel by navigating to
https://yourdomain.com/cpanel.
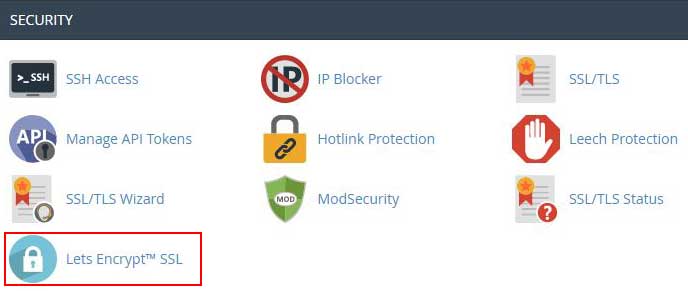
2. Go to Let’s Encrypt SSL
- Scroll down to the Security section and click on “Let’s Encrypt SSL.”
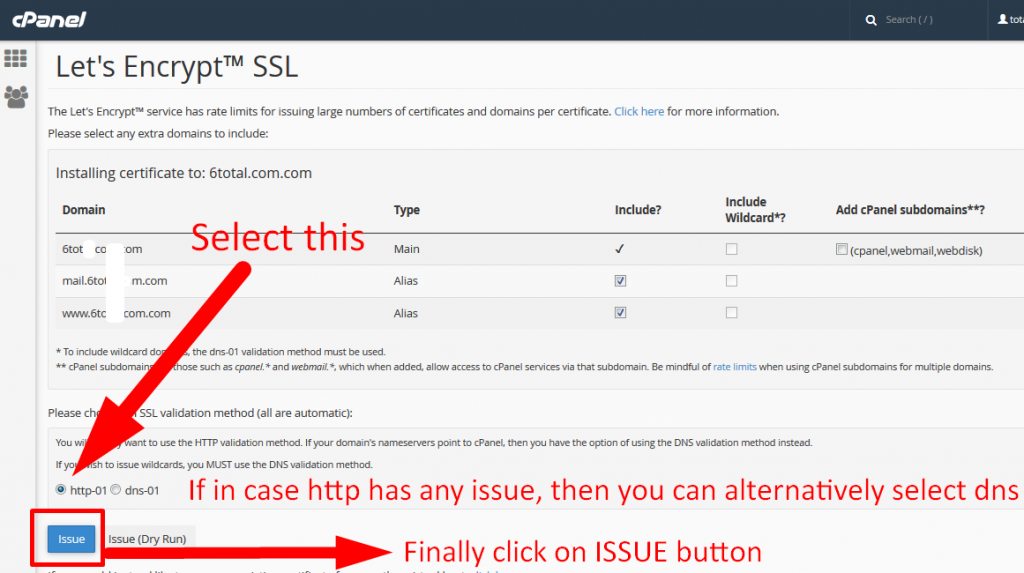
3. Select the Domain to Install SSL
- In the Let’s Encrypt interface, you’ll see all available domains. Click “Issue” next to the domain you want to secure.
4. Choose SSL Options
- You may be presented with additional options, such as selecting a wildcard SSL (which will secure both your main domain and subdomains).
- Click “Issue” once you’ve selected the appropriate options.
5. Verify SSL Installation
- Once the SSL certificate is issued, visit your website and check for the HTTPS padlock to confirm the installation.
Key Features of Let’s Encrypt SSL:
- Free SSL Certificates: Let’s Encrypt provides free, widely trusted SSL certificates.
- Wildcard SSL Support: Protects your main domain and all subdomains.
- Manual Control: Allows you to manage SSL installation and renewal manually.
Why Choose Let’s Encrypt for SSL?
- Cost-Effective: Let’s Encrypt provides free SSL certificates, eliminating the need to pay for SSL.
- Trusted by All Browsers: Certificates issued by Let’s Encrypt are accepted by all major browsers.
- Security: With automated renewals and industry-standard encryption, Let’s Encrypt ensures your site remains secure.
Conclusion
Installing SSL on your website is essential for security, SEO, and user trust. Thanks to cPanel AutoSSL and Let’s Encrypt SSL, securing your website has never been easier. Whether you choose the automated convenience of AutoSSL or prefer manual control via the Let’s Encrypt SSL interface, this guide ensures your website will be HTTPS-enabled, providing protection and boosting SEO rankings.
Take action now to secure your website and enjoy the benefits of improved security, better SEO rankings, and increased visitor trust.