
 PKR
PKR 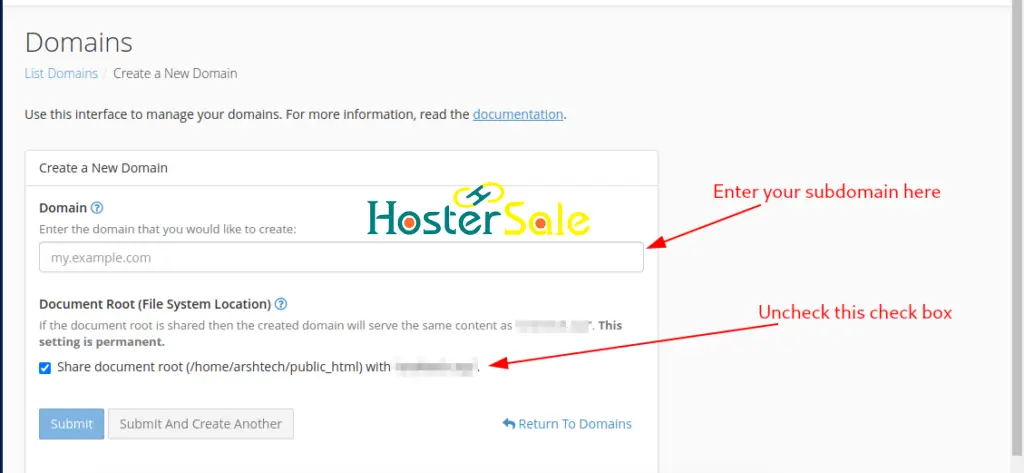
Managing multiple domains and creating subdomains can significantly enhance your online presence, allowing you to host multiple websites or organize your existing site more effectively. At HosterSale, we make this process simple and efficient.
In this guide, we’ll walk you through the steps to add new domains and create subdomains using the Domains section in cPanel.
Why HosterSale is Perfect for Web Hosting?
HosterSale offers the best tools and features for seamless domain management:
- Unlimited Domain and Subdomain Options
- Free SSL Certificates for secure browsing (Learn to install SSL in cPanel)
- High-Performance Servers with LiteSpeed technology
- 24/7 Support Team to help with any issues
- Daily Automated Backups for complete data security
With these features, HosterSale ensures that domain management is hassle-free and reliable.
How to Add a New Domain in cPanel
Adding a domain allows you to host a completely separate website under your HosterSale account. Here’s how you can do it:
Step 1: Log in to Your cPanel
- Access your cPanel through the link provided by HosterSale.
- Enter your username and password to log in.
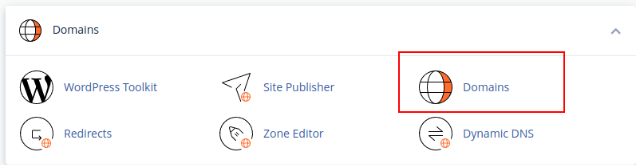
Step 2: Open the Domains Management Section
- Once inside cPanel, look for the Domains section.
- Click Domains to access the domain management options.
Step 3: Add Your Domain
- Click the Create a New Domain button.
- Enter the full domain name you wish to add, such as mywebsite.com.
- Decide whether you want to use the default directory or create a custom one for your domain (e.g.,
/public_html/mywebsite). - Click Save to finalize the process.
Your new domain is now ready, and you can begin uploading files or installing a CMS like WordPress.
How to Create a Subdomain in cPanel
Subdomains are an excellent way to organize sections of your website. For example, you can use a subdomain for a blog, a store, or a portfolio. With HosterSale hosting, you can create as many subdomains as you need.
Step 1: Access the Domains Section
Log in to your cPanel account and navigate to the Domains section.
Step 2: Add the Subdomain
- Click Create a New Domain under the Domains section.
- Enter the full name of your subdomain (e.g., store.mywebsite.com).
- Specify the directory where you want to store the subdomain’s files, such as
/public_html/store. - Click Save to complete the setup.
Your subdomain is now live and ready for use.
Why Use Subdomains?
Subdomains are a great way to expand and manage your website. Here’s why they are useful:
- Enhanced SEO: Focus on niche keywords for better ranking.
- Cost Efficiency: Subdomains are free to create with your HosterSale hosting account.
- Streamlined Management: Keep sections like blogs, e-commerce stores, and forums separate for easier organization.
Pro Tips for Better Domain and Subdomain Management
- Enable SSL: HosterSale offers free SSL for every domain and subdomain, ensuring secure browsing for your visitors.
- Use CMS Tools: Install WordPress or other CMS platforms with just a few clicks using the Softaculous installer provided in cPanel.
- Optimize Performance: Use caching tools and performance settings in cPanel to keep your site loading fast.
FAQs
Can I Add Multiple Domains and Subdomains?
Yes, all HosterSale hosting plans support unlimited domains and subdomains.
Will My Subdomains Be Secured with SSL?
Absolutely! HosterSale provides free SSL certificates for every domain and subdomain added to your account.
Can I Use WordPress on a Subdomain?
Of course! You can install WordPress or any other CMS on your subdomain using the Softaculous app installer in cPanel.
Final Thoughts
HosterSale’s cPanel hosting gives you complete control over your domains and subdomains. Whether you’re managing multiple websites or organizing your content, our easy-to-use tools and expert support make the process seamless.
Sign up for a HosterSale hosting plan today and unlock the full potential of domain management. With powerful tools, free SSL, and 24/7 support, you can focus on growing your online presence without any hassles.
For more helpful guides, visit our HosterSale Blog or contact our support team for assistance.