
 PKR
PKR 
Launching your own website might sound technical, but with the right tools, it’s surprisingly easy. If you’re a blogger, small business owner, or just someone eager to start a WordPress site, cPanel hosting makes the setup smooth and stress-free.
In this beginner-friendly guide, we’ll walk you through how to install WordPress on cPanel, ensuring your site is fast, secure, and built on solid ground. Whether you’re setting up your first blog or building an online store, HosterSale has your back with reliable and efficient WordPress hosting.
🚀 Why Use cPanel for WordPress Installation?
Before we dive into the installation steps, let’s understand why cPanel is such a popular choice:
- User-Friendly Interface – No coding skills needed.
- One-Click Installers – Tools like Softaculous make setup lightning fast.
- Full Control – Manage your files, domains, email, and backups from one place.
- Performance Ready – Optimized for fast-loading WordPress websites.
Pro Tip: Most quality hosting services (like HosterSale) include cPanel with their hosting plans—making your life a whole lot easier.
🛠️ What You’ll Need Before Installation
To install WordPress on cPanel, make sure you have:
- An active cPanel hosting plan (HosterSale provides excellent options).
- A domain name linked to your hosting.
- Access to your cPanel dashboard.
- Optional: An SSL certificate (free with HosterSale plans).
Related: Why Daily Backups Matter: How HosterSale’s JetBackup Protects You
🧩 Option 1: One-Click WordPress Installation with Softaculous
This is the easiest and fastest way to get your WordPress site up and running.
✅ How to Use Softaculous:
- Login to your cPanel account via
yourdomain.com/cpanel. - Scroll to the Software section and click Softaculous Apps Installer.
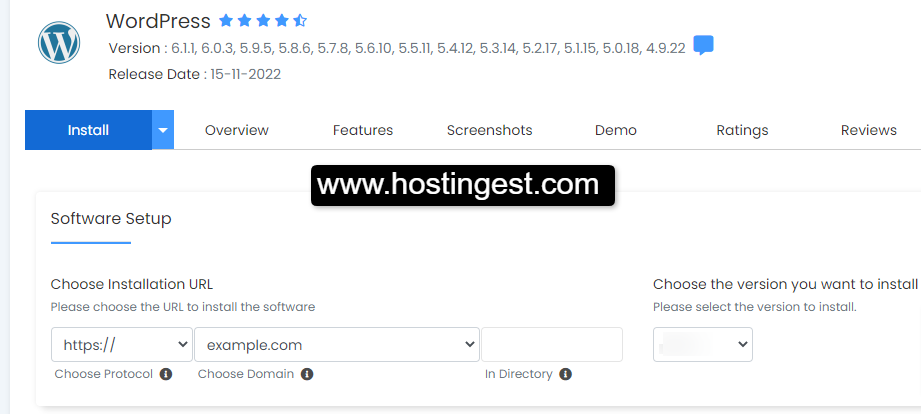
- Select WordPress from the list of available apps.
- Click Install Now.
- Fill in the following:
- Protocol: Choose
https://(if SSL is active) orhttp:// - Domain: Pick the domain where you want WordPress installed.
- Directory: Leave blank if you want to install on the root (
yourdomain.com). Add/blogor/storefor a subfolder. - Site Name and Site Description: You can change these later in WordPress.
- Admin Username, Password, and Email: Choose strong credentials.
- Protocol: Choose
- Choose a theme (or skip for now).
- Click Install. Wait a few seconds for it to complete.
🔗 You’ll get two links:
- Your website:
yourdomain.com - WordPress Admin:
yourdomain.com/wp-admin
That’s it! You’ve successfully installed WordPress in just a few clicks.
🛠️ Option 2: Manual WordPress Installation (Advanced Users)
If you prefer more control or don’t have Softaculous, here’s how to do it manually.
Step 1: Download WordPress
- Go to wordpress.org and download the latest version.
Step 2: Upload Files to Your Server
- In cPanel, open File Manager.
- Navigate to the
public_htmldirectory (or a subfolder). - Click Upload and select the WordPress ZIP file.
- Once uploaded, extract the ZIP file.
- Move all contents from the
wordpressfolder topublic_html.
Step 3: Create a Database
- Go to MySQL Database Wizard.
- Create a new database.
- Add a new database user and assign it to the database.
- Grant All Privileges.
Related: Effortless cPanel Database Management and phpMyAdmin: Step-by-Step Tutorials and Pro Tips
Step 4: Configure wp-config.php
- Locate the file
wp-config-sample.php. - Rename it to
wp-config.php. - Edit the file and update the database name, user, and password:
define('DB_NAME', 'your_db_name'); define('DB_USER', 'your_username'); define('DB_PASSWORD', 'your_password'); define('DB_HOST', 'localhost');- Save and close.
Step 5: Complete the Installation
Visit yourdomain.com/wp-admin/install.php in your browser. Fill in:
- Site title
- Admin credentials
- Email address
Click Install WordPress.
You’re all set!
Related: HosterSale vs Bluehost vs Hostinger: Honest Best Web Hosting Comparison for 2025
🛡️ Post-Installation Tips for Better WordPress Hosting
Now that WordPress is installed, make sure your site runs smoothly and securely.
🔒 Secure Your Site
- Change the default
wp_database prefix. - Avoid using “admin” as your username.
- Enable SSL for secure browsing.
- Install a security plugin (like Wordfence or Sucuri).
⚡ Speed Up Your Website
- Use a caching plugin like LiteSpeed Cache (ideal with HosterSale hosting).
- Optimize images using plugins like Smush or ShortPixel.
- Choose a lightweight theme (e.g., Astra or GeneratePress).
🔄 Automate Backups
- Use plugins like UpdraftPlus or enable JetBackup in cPanel.
- Schedule regular backups and store them offsite (Dropbox, Google Drive).
🔧 Keep Everything Updated
- Regularly update WordPress core, themes, and plugins.
- Remove unused themes and plugins to improve performance.
💡 FAQs: Installing WordPress on cPanel
❓ Can I install WordPress without Softaculous?
Yes! You can manually install WordPress using File Manager and the database tools in cPanel.
❓ How long does WordPress installation take?
With Softaculous: about 2 minutes.
Manual method: around 10–15 minutes.
❓ What if I get a “Database Connection Error”?
Check your wp-config.php file for correct DB name, username, and password.
❓ Is cPanel the only way to install WordPress?
No, but it’s the easiest and most popular method for shared hosting environments.
🏁 Final Thoughts: Start Building with Confidence
Installing WordPress on cPanel is the first step toward building your dream website. Whether you want to share your ideas through a blog, open an online store, or showcase your business, WordPress paired with HosterSale’s optimized hosting makes it effortless.
Ready to get started?
👉 Choose your HosterSale WordPress Hosting Plan now